

Bambu Lab P2S Maintenance Schedule
Another no-panic maintenance guide for normal home use

The Bambu Lab P2S is a newer, more refined machine than the P1S, but it still needs regular maintenance.
The good news: you do not need to turn maintenance into printer witchcraft.
The bad news: if you ignore the moving parts, filament path, filters, fans, cutter, PTFE tubes, and build plate long enough, the printer will eventually make that your problem.
This guide is for a normal home-use Bambu Lab P2S printing mostly PLA and PETG.
Shorten the timelines if you print daily, run long jobs constantly, print ABS/ASA often, use abrasive filaments like carbon fiber, glass fiber, glow, or wood-filled materials, or use an AMS 2 Pro heavily.
Wiggy translation:
The P2S is good. It is not immortal. Do the boring maintenance before it becomes a weird noise.
Important P2S Difference: Do Not Copy the P1S Routine Blindly
A lot of Bambu maintenance advice online comes from the P1S, X1C, and older CoreXY machines.
Some of that advice carries over.
Some of it does not.
The big thing to know:
The P2S has its own maintenance guidance. Use P2S-specific instructions when available.
For example, older P1S-style advice often says to clean the X-axis carbon rods with IPA and never grease them. That is correct for the P1/P1S carbon rod setup.
The P2S maintenance guidance is different. Bambu’s P2S/X2D XYZ-axis cleaning and lubrication process includes cleaning and lubricating the motion system, using grease on lead screws and lubricating oil on rods.
Wiggy translation:
Do not maintain a P2S like it is a P1S wearing a new hat. Similar family, different maintenance details.
Supplies to Keep on Hand
You do not need a full repair bench, but you should keep a small P2S maintenance kit ready.
Recommended supplies:
90%+ isopropyl alcohol
Lint-free cloths or microfiber cloths
Cotton swabs or precision swabs
Small cleaning brush
Compressed air or electric air duster
Light machine oil / synthetic lubricating oil
Plastic-safe synthetic grease or PTFE/silicone grease
Replacement nozzle wipers
Replacement filament cutter blades
Replacement PTFE tube
Replacement hotend silicone socks
Replacement activated carbon filter
Dish soap for build plate cleaning
AMS 2 Pro desiccant, if using AMS
Small container or tray for screws during maintenance
Amazon links for recommended supplies
These Amazon links are search links so you can pick the current highest-rated, compatible option. Ratings, stock, and prices change constantly, so check compatibility and reviews before buying.
Cleaning supplies
Lubricants
Bambu P2S consumables
AMS 2 Pro supplies
Buyer note:
For official Bambu parts, I would usually check Bambu Lab’s store first. Amazon is convenient, but make sure the part specifically lists compatibility with P2S, P2S Combo, or AMS 2 Pro before buying.
Fast Maintenance Schedule
Bambu’s official P2S maintenance guidance is usage-based, so the right schedule depends on how much you print.
Before every print
Check build plate cleanliness
Check nozzle area for stuck plastic
Check purge chute / poop path
Remove loose filament bits
Make sure the first layer starts cleanly
After every few prints
Empty purge waste
Wipe loose chamber debris
Inspect nozzle and silicone sock
Check for filament strings near fans, rods, or the bed
Weekly
Wipe loose chamber dust and debris
Lightly inspect fans and vents
Check the purge chute
Check AMS 2 Pro humidity/desiccant if using AMS
Inspect the build plate surface
Monthly
Inspect motion system
Inspect belts
Clean the camera if needed
Inspect nozzle, silicone sock, wiper, cutter, and filament path
Check AMS 2 Pro rollers, desiccant, and PTFE tubes if equipped
Usage-based P2S motion maintenance
Wiggy translation:
If the printer is working harder, maintenance needs to show up sooner. That is not drama. That is machinery.
1. Build Plate
When to do it
Every print, or whenever adhesion gets weird.
Why it matters
Most “printer problems” are actually build plate problems.
Fingerprints, dust, grease, glue residue, and tiny leftover plastic bits can make prints stop sticking even when the printer itself is fine.
What to do
Remove the plate.
Wash it with warm water and dish soap.
Dry it fully with a clean towel.
Avoid touching the print surface with your fingers.
Use isopropyl alcohol only for quick touch-ups, not as a full replacement for soap washing.
Timeline
For PLA and PETG, wash every few prints or whenever adhesion drops. Wash immediately if you touched the plate a lot.
Recommended supplies:
Wiggy translation:
Before you blame the printer, wash the plate. Yes, again.
2. Nozzle Wiper and Purge Chute
When to do it
Quick check before big prints. Clean weekly. Replace parts as needed.
Why it matters
The P2S purges filament and cleans the nozzle during print starts, filament changes, and calibration routines. If the wiper is worn or the purge area is clogged, you can get blobs, failed purges, messy starts, and random plastic nonsense.
What to do
Open the printer.
Check the nozzle wiper area.
Remove stuck filament blobs.
Make sure the purge chute is clear.
Replace the wiper if it is torn, loose, hardened, bent, or no longer wiping cleanly.
Recommended parts:
Wiggy translation:
The printer poops plastic. Make sure the toilet is not clogged.
3. XY-Axis Cleaning and Lubrication
When to do it
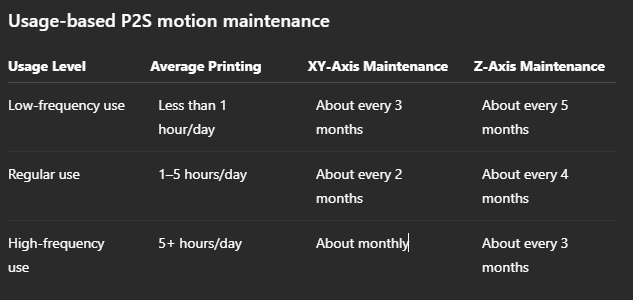
Use the official P2S usage-based schedule:
Low use: about every 3 months
Regular use: about every 2 months
Heavy use: about monthly
Why it matters
The XY motion system moves the toolhead. Dust, debris, dry rods, or rough movement can affect print quality, noise, resonance, and motion reliability.
What to do
Turn off the printer.
Remove loose debris inside the chamber.
Clean the motion rods/rails according to Bambu’s P2S guide.
Apply the correct lubricant only where the P2S guide calls for it.
Move the toolhead gently to distribute lubricant.
Wipe off excess.
Important
Do not assume older P1S carbon-rod maintenance instructions apply here. The P2S has its own XYZ-axis maintenance process.
Recommended supplies:
Wiggy translation:
Light lubrication is maintenance. Randomly spraying stuff inside the printer is a cry for help.
4. Z-Axis Lead Screws and Rods
When to do it
Use the official P2S usage-based schedule:
Low use: about every 5 months
Regular use: about every 4 months
Heavy use: about every 3 months
Why it matters
The Z-axis moves the bed up and down. The P2S uses lead screws and rods that need cleaning and lubrication so movement stays smooth.
What to do
Turn off the printer.
Move the bed to a comfortable height if needed.
Wipe old grease or dirt from the Z lead screws.
Apply grease evenly to the three lead screws.
Apply lubricating oil lightly to the rods where directed.
Power on the printer.
Move the bed up and down to distribute lubricant.
Wipe away excess.
Important
More grease is not better. Too much grease collects dust and turns maintenance into future drag.
Recommended supplies:
Wiggy translation:
Grease the screws. Do not frost them like a cupcake.
5. Idler Pulleys
When to do it
As needed, especially if the printer squeaks, movement feels rough, or the official maintenance process calls for pulley lubrication.
Why it matters
Pulleys help guide belt movement. Dry or noisy pulleys can create squeaks and rough motion.
What to do
Turn off the printer.
Locate the noisy pulley area.
Apply a tiny amount of light oil to the pulley axle/interface area.
Keep oil off the belts.
Move the toolhead manually to distribute.
Wipe any excess.
Important
Do not oil the belts.
Recommended supplies:
Wiggy translation:
Oil the pulley if it squeaks. Do not marinate the belt.
6. Belts and Belt Tension
When to do it
Visual check monthly. Run belt tension procedures if print quality degrades, after major maintenance, or if the printer reports motion-related issues.
Why it matters
Belts control toolhead movement. Belt issues can show up as ringing, layer shifts, diagonal artifacts, odd walls, or motion warnings.
What to check
Fraying
Missing teeth
Dust buildup
Oil contamination
Loose-looking movement
Ringing or layer shifts
Motion calibration errors
Important
After belt work, run calibration.
Wiggy translation:
If oil gets on the belt, you did not maintain the printer. You created a new side quest.
7. Extruder Assembly
When to do it
Every few months for normal use, or immediately if feeding issues appear.
Signs it needs attention
Clicking during extrusion
Under-extrusion
Grinding filament
Filament dust near gears
Feeding resistance
Filament path errors
Frequent AMS 2 Pro load/unload issues
Basic cleaning
Unload filament.
Power off the printer.
Open or remove the toolhead cover according to Bambu’s P2S guide.
Use compressed air or a soft brush to remove filament dust.
Inspect the gear and filament path.
If doing a full teardown, lubricate the gears only according to Bambu’s instructions.
Reassemble and test feed filament.
Recommended supplies:
Wiggy translation:
If the extruder is clicking, it is not being dramatic. Something is in the way.
8. Filament Cutter
When to do it
Check every few rolls for normal filament. Check more often if using abrasive filament or doing frequent AMS color/material changes.
Why it matters
The cutter is part of filament changes and unloading. A dull blade can cause bad cuts, stringy ends, failed unloads, and AMS problems.
Signs it needs replacing
Filament does not cut cleanly
AMS load/unload issues
Stringy cut ends
Repeated cutter errors
Increased force or noise during cutting
Recommended parts:
Wiggy translation:
A dull cutter turns filament changes into printer nonsense. Replace the tiny blade before it becomes a whole personality.
9. Nozzle and Hotend
When to do it
Inspect monthly. Clean or replace as needed.
What to look for
Burnt plastic buildup
Bent nozzle tip
Clogs
Poor extrusion
Rough top surfaces
Inconsistent lines
Filament curling upward during extrusion
Silicone sock that is loose, torn, burnt, or not seated
Maintenance options
Carefully wipe the nozzle with the proper tool.
Use the P2S cold-pull/nozzle unclogging procedure for partial clogs.
Replace the nozzle or hotend if clogs continue.
Replace the silicone sock if damaged.
Recommended parts:
Wiggy translation:
If plastic is curling up like it is trying to escape, check the nozzle.
10. Cooling Fans and Chamber
When to do it
Weekly if you print a lot. Monthly for light use.
Why it matters
Fans and vents collect dust, plastic hair, and tiny bits of filament. That can affect cooling, airflow, and general print reliability.
What to do
Turn the printer off.
Hold fan blades still.
Use compressed air gently.
Remove dust and filament strings.
Wipe the interior panels and bottom of the printer.
Recommended supplies:
Wiggy translation:
Hold the fan blades still. Spinning them with air like a tiny carnival ride is not the goal.
11. Chamber Camera
When to do it
As needed, or about every few months. Clean sooner if the image looks blurry or if you print ABS/ASA often.
What to do
Use a microfiber cloth or cotton swab.
Lightly dampen with isopropyl alcohol if needed.
Wipe gently.
Do not flood the lens area.
Recommended supplies:
Wiggy translation:
If the camera looks like it was filmed through mashed potatoes, clean the lens.
12. Activated Carbon Air Filter
When to do it
Replace periodically. Replace sooner if printing ABS/ASA often, odor increases, or the filter looks used up.
Why it matters
The P2S uses an activated carbon filter. It is a consumable part. It does not last forever.
What to do
Power off the printer.
Remove the air filter cover according to Bambu’s P2S filter replacement guide.
Pull out the old filter.
Insert the new filter in the same orientation.
Reinstall the cover.
Recommended parts:
Wiggy translation:
If you print stinky materials, do not treat the filter like it lives forever. It does not.
13. AMS 2 Pro Maintenance
This section applies if you have a P2S Combo or use AMS 2 Pro.
Desiccant
Check regularly. Replace or recharge desiccant when it is saturated or no longer keeping humidity low.
What to do:
Check the AMS 2 Pro humidity/desiccant status.
Replace or recharge desiccant when saturated.
Keep the AMS lid sealed.
Do not leave the AMS open longer than needed.
Recommended supplies:
PTFE Tubes
Inspect during maintenance and replace if worn, grooved, cracked, or causing feeding resistance.
Recommended parts:
Rollers and Feed Path
Check monthly if you use AMS regularly.
What to do:
Remove spools.
Check rollers for dust or debris.
Remove broken filament bits.
Make sure spools rotate smoothly.
Look for feeding resistance.
Wiggy translation:
The AMS 2 Pro is great, but it is not magic. It still has tubes, rollers, and tiny places for plastic nonsense to hide.
14. Abrasive Filament Maintenance
Abrasive materials include:
Carbon fiber-filled filament
Glass fiber-filled filament
Glow-in-the-dark filament
Some wood-filled filament
Some metal-filled filament
If you print abrasive materials:
Use a hardened nozzle.
Use hardened extruder gears if required.
Inspect nozzle wear more often.
Inspect cutter more often.
Inspect PTFE tubes more often.
Clean the extruder more often.
Expect consumables to wear faster.
Recommended parts:
Wiggy translation:
Abrasive filament is cool, but it eats consumables like it pays rent.
Real-Life P2S Maintenance Routine
Light user: a few prints per week
Do this:
Every print: check plate, nozzle, wiper, and purge chute.
Weekly: wipe obvious chamber debris.
Monthly: inspect belts, fans, nozzle, cutter, camera, and AMS if equipped.
Every 3 months: XY-axis cleaning/lubrication.
Every 5 months: Z-axis cleaning/lubrication.
As needed: replace filters, cutter, PTFE tubes, silicone sock, and hotend parts.
Regular user: printing 1–5 hours per day
Do this:
Every print: check plate and purge path.
Weekly: clean chamber, fans, and loose filament debris.
Monthly: inspect belts, cutter, nozzle, filter, and AMS.
Every 2 months: XY-axis maintenance.
Every 4 months: Z-axis maintenance.
As needed: cold pull, extruder cleaning, PTFE replacement, filter replacement.
Heavy user: printing 5+ hours per day
Do this:
Weekly: clean chamber, purge chute, fans, and AMS dust.
Monthly: XY-axis maintenance, belt inspection, cutter inspection, nozzle check, extruder path inspection.
Every 3 months: Z-axis maintenance.
Replace filters sooner if printing ABS/ASA or if odor increases.
Inspect abrasive-wear items more often.
Wiggy translation:
The more hours you run, the less you get to pretend maintenance is optional.
Full Monthly / Quarterly Maintenance Order
Use this when you want to do a proper maintenance pass.
Remove filament and power off.
Clean the build plate separately.
Empty the purge chute.
Wipe chamber debris.
Inspect nozzle, silicone sock, and wiper.
Inspect cutter.
Inspect belts.
Clean fans while holding blades still.
Clean camera if needed.
Do XY-axis maintenance if due.
Do Z-axis maintenance if due.
Inspect extruder path if you have feeding symptoms.
Inspect AMS 2 Pro desiccant, rollers, and PTFE tubes if equipped.
Replace carbon filter if due or if odor increases.
Power on.
Move bed/toolhead to distribute lubrication if maintenance was performed.
Run calibration after motion system or belt work.
The Big Don’ts
Do not:
Copy P1S carbon rod instructions blindly onto the P2S.
Over-lube anything.
Get oil on the belts.
Spray lubricant randomly inside the printer.
Use compressed air without holding fan blades still.
Ignore filament dust in the extruder.
Let the purge chute become a plastic cave.
Run abrasive filament without expecting extra wear.
Treat the carbon filter like it lasts forever.
Replace parts blindly before identifying the problem.
Use random third-party parts without checking P2S compatibility.
Wiggy translation:
Maintenance is not “spray stuff until the printer feels loved.” Be specific.
Final Takeaway
The Bambu Lab P2S is a strong machine, but it still needs regular care.
The simple version (TLDR):
Keep the build plate clean.
Keep the purge path clear.
Inspect the nozzle, wiper, cutter, and silicone sock.
Follow P2S-specific XY and Z maintenance intervals.
Grease what should be greased.
Oil what should be oiled.
Keep oil off the belts.
Replace filters and consumables before they cause failures.
Do maintenance sooner if you print more often.
Most P2S maintenance is not hard. It is just easy to forget until the printer starts giving you symptoms.
Wiggy’s final word:
Keep it clean, keep it lightly lubed where it actually needs lube, and do not turn basic maintenance into printer witchcraft.